Capturing Comet C/2025 F2 SWAN

In late March 2025, a new comet, C/2025 F2, was found in imagery from the Solar Wind Anisotropies (SWAN) camera on the Solar and Heliospheric Observatory (SOHO). 

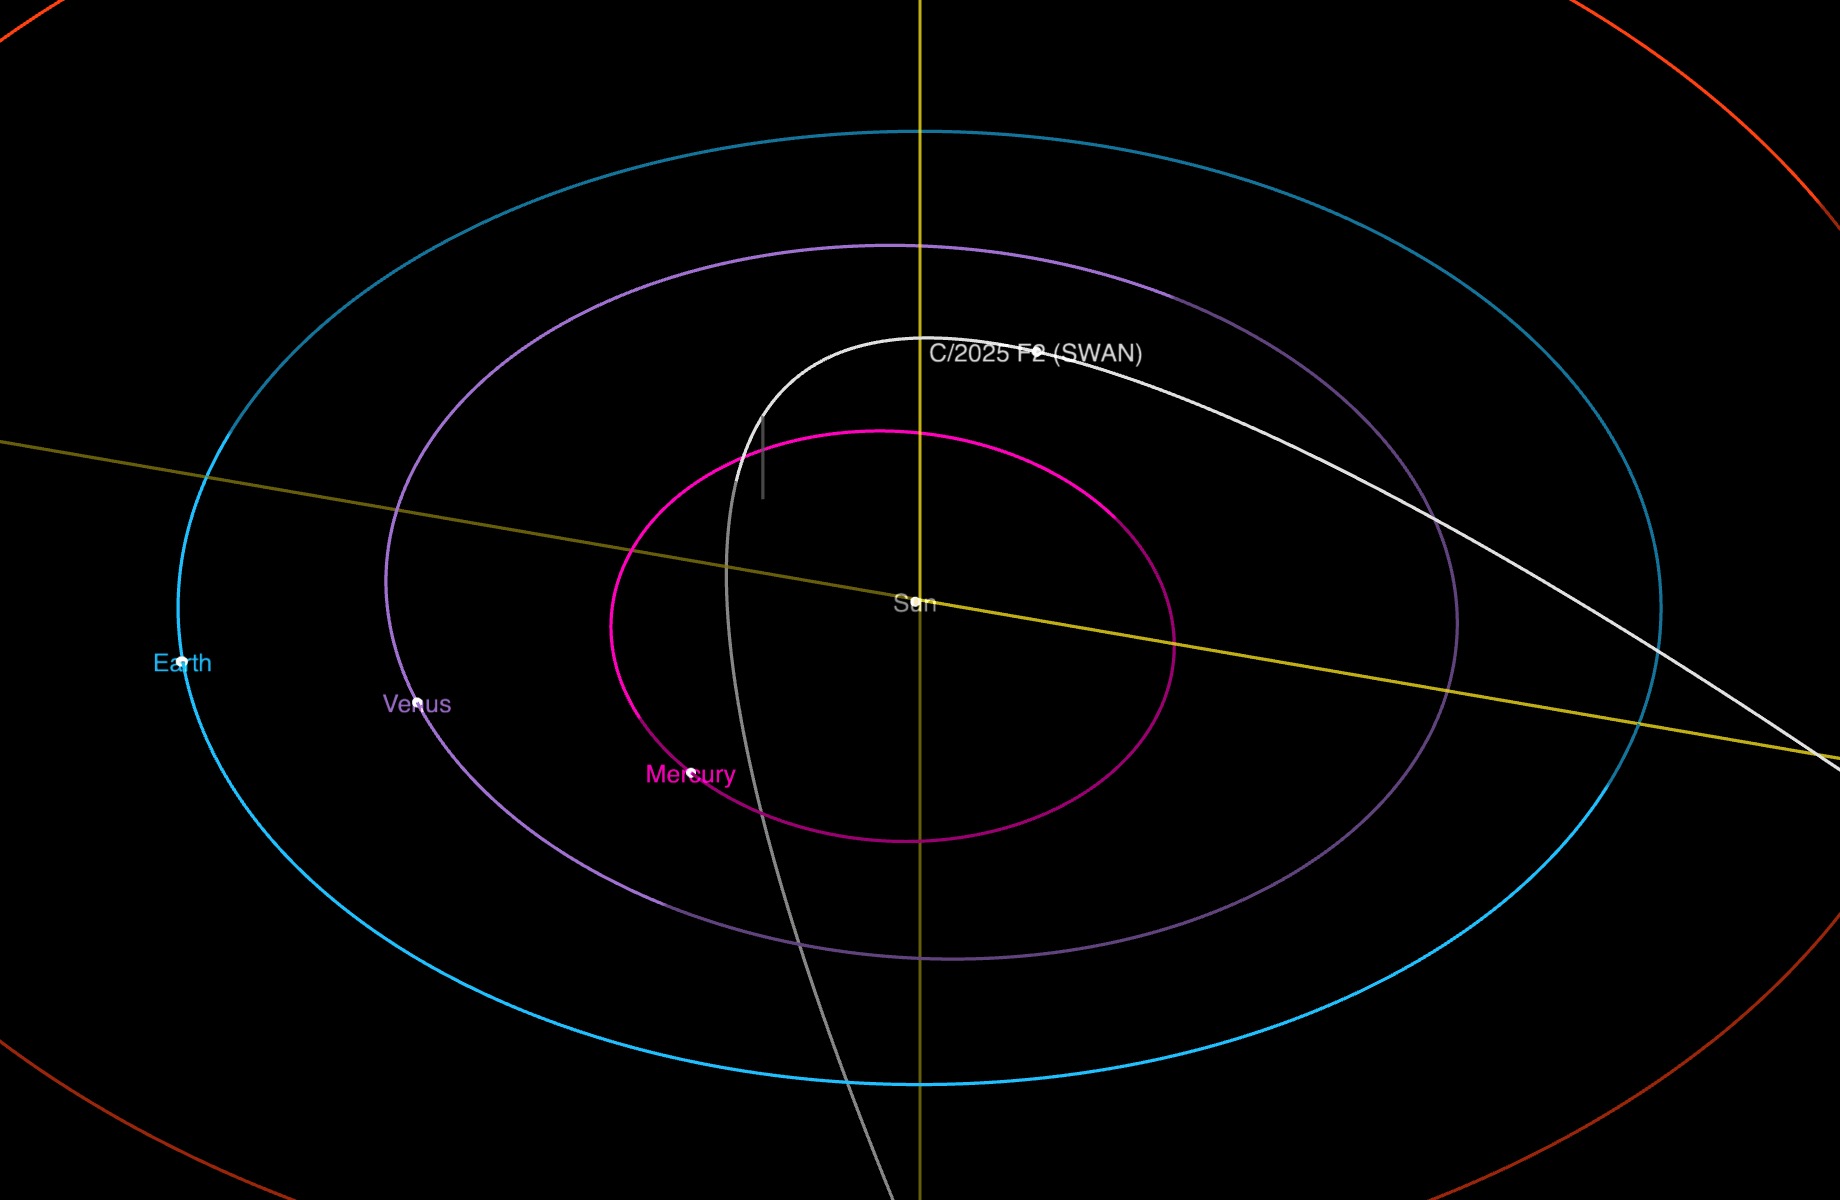
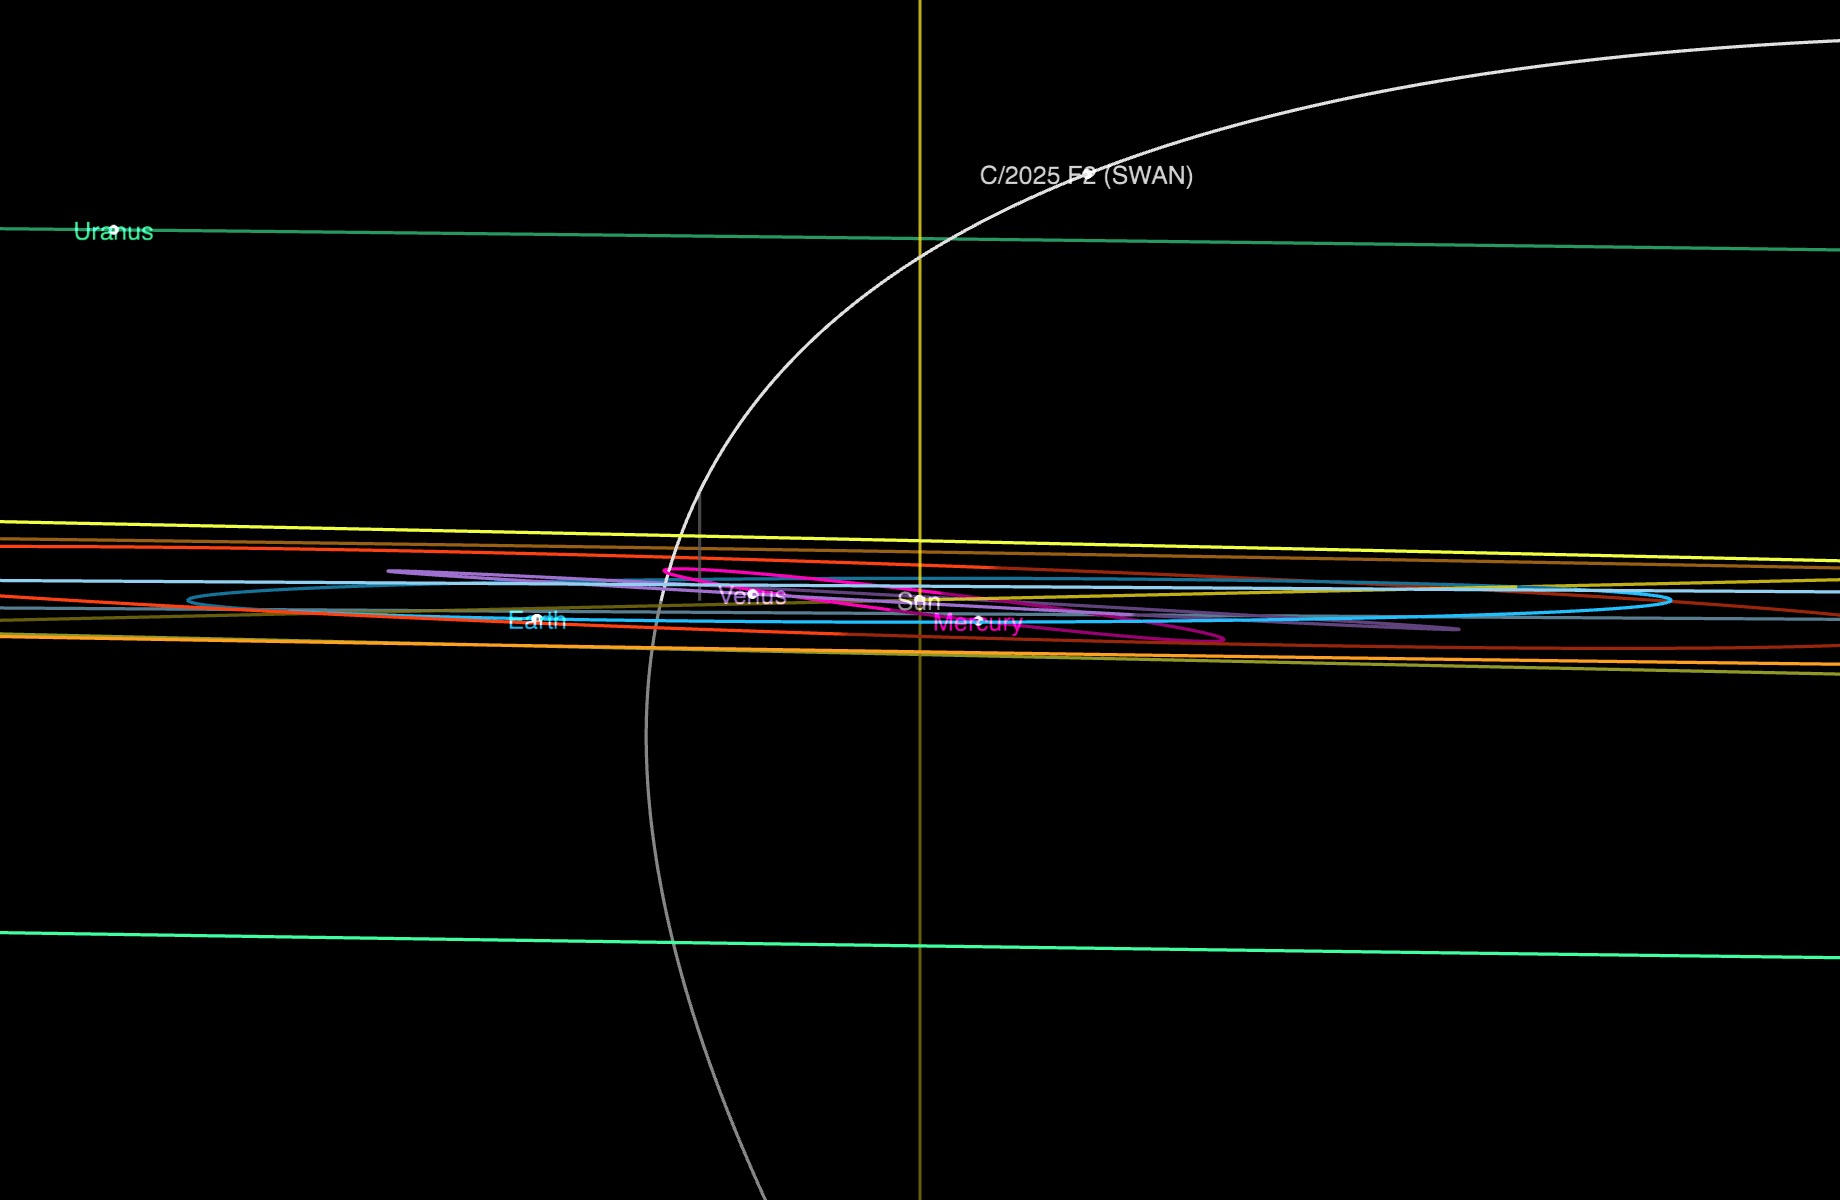
Orbit images Courtesy NASA/JPL-Caltech.

The Jet Propulsion Laboratory (JPL) has a great orbital dynamics viewer where you can see its orbit relative to the planets.  It’s quite fun to play with!  C/2025 F2’s orbit is very parabolic and nearly 90 degrees out of the ecliptic plane.  It is coming in from north of the ecliptic plane, will loop around the sun near Mercury’s orbit on May 1, 2025, and then head back out to the outer solar system south of the ecliptic plane.  So it’s visible from the Northern Hemisphere in the early morning now, but as it approaches the sun, it will get more and more difficult to spot, and it will be more visible from the Southern Hemisphere on its outgoing trajectory.

“Now” was the best time to see it from the Northern Hemisphere, and we have had a nice string of days with clear skies, so last weekend, it was time to go comet hunting!  

I used the JPL Horizons System to predict the comet location and motion so that I knew where to point my telescope and I knew how long the images could be without “smearing” the comet – 15 seconds for my telescope and camera combo.

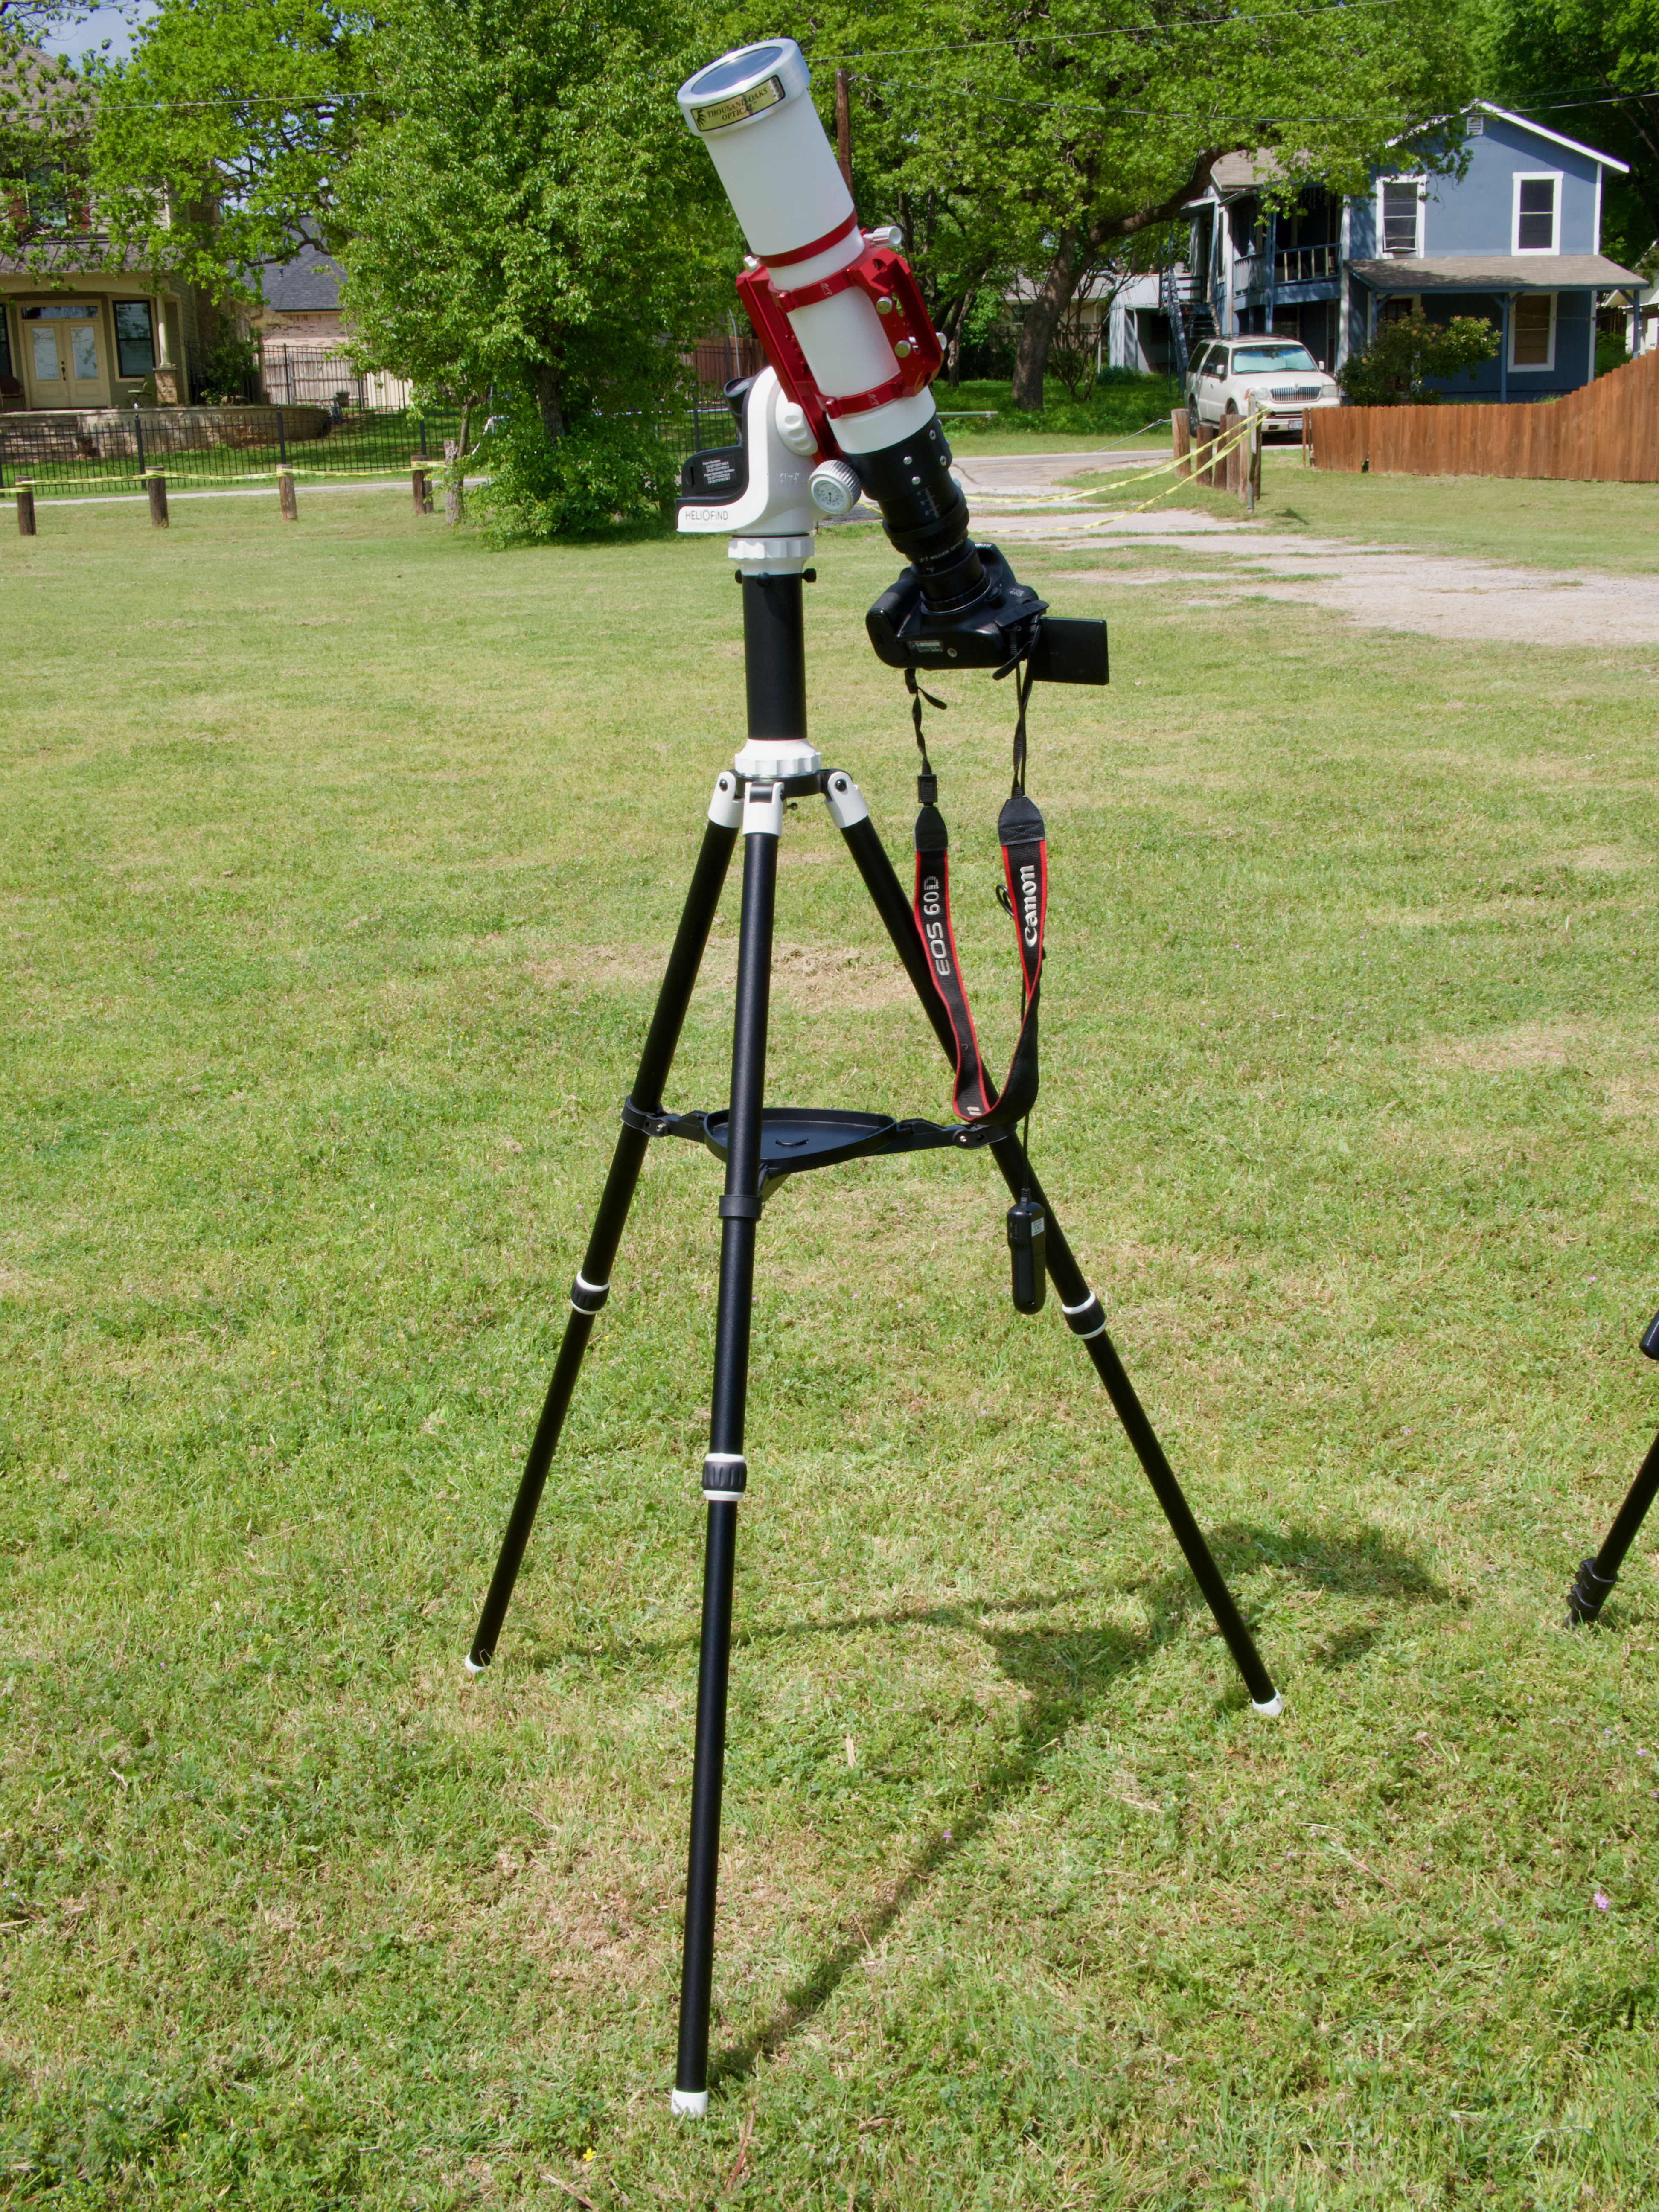
I loaded up my gear, and my husband and I drove to our favorite early morning comet viewing site in Bacliff, Texas.  By the time I had everything set up, the comet was above the horizon.  My preprogrammed location contained a small, fuzzy object which looked like a comet on the first try!  I was really delighted that everything worked on the first try; this has not always been the case in the past.  I spent some (probably too much) time trying to get it positioned better in the frame and started imaging.  It was brighter in green than in red and blue which, with its fuzziness, confirmed to me that it was likely a comet.  I couldn’t see a tail in my single images.

I set up my regular camera to see if I could get some wider field images.  Given what I ended up with in the telescope images, I do not think the comet will be visible in the wider field images.

Both my husband and I tried to find the comet with binoculars, with no luck at all.  

We finished the morning with a lovely sunrise and breakfast.

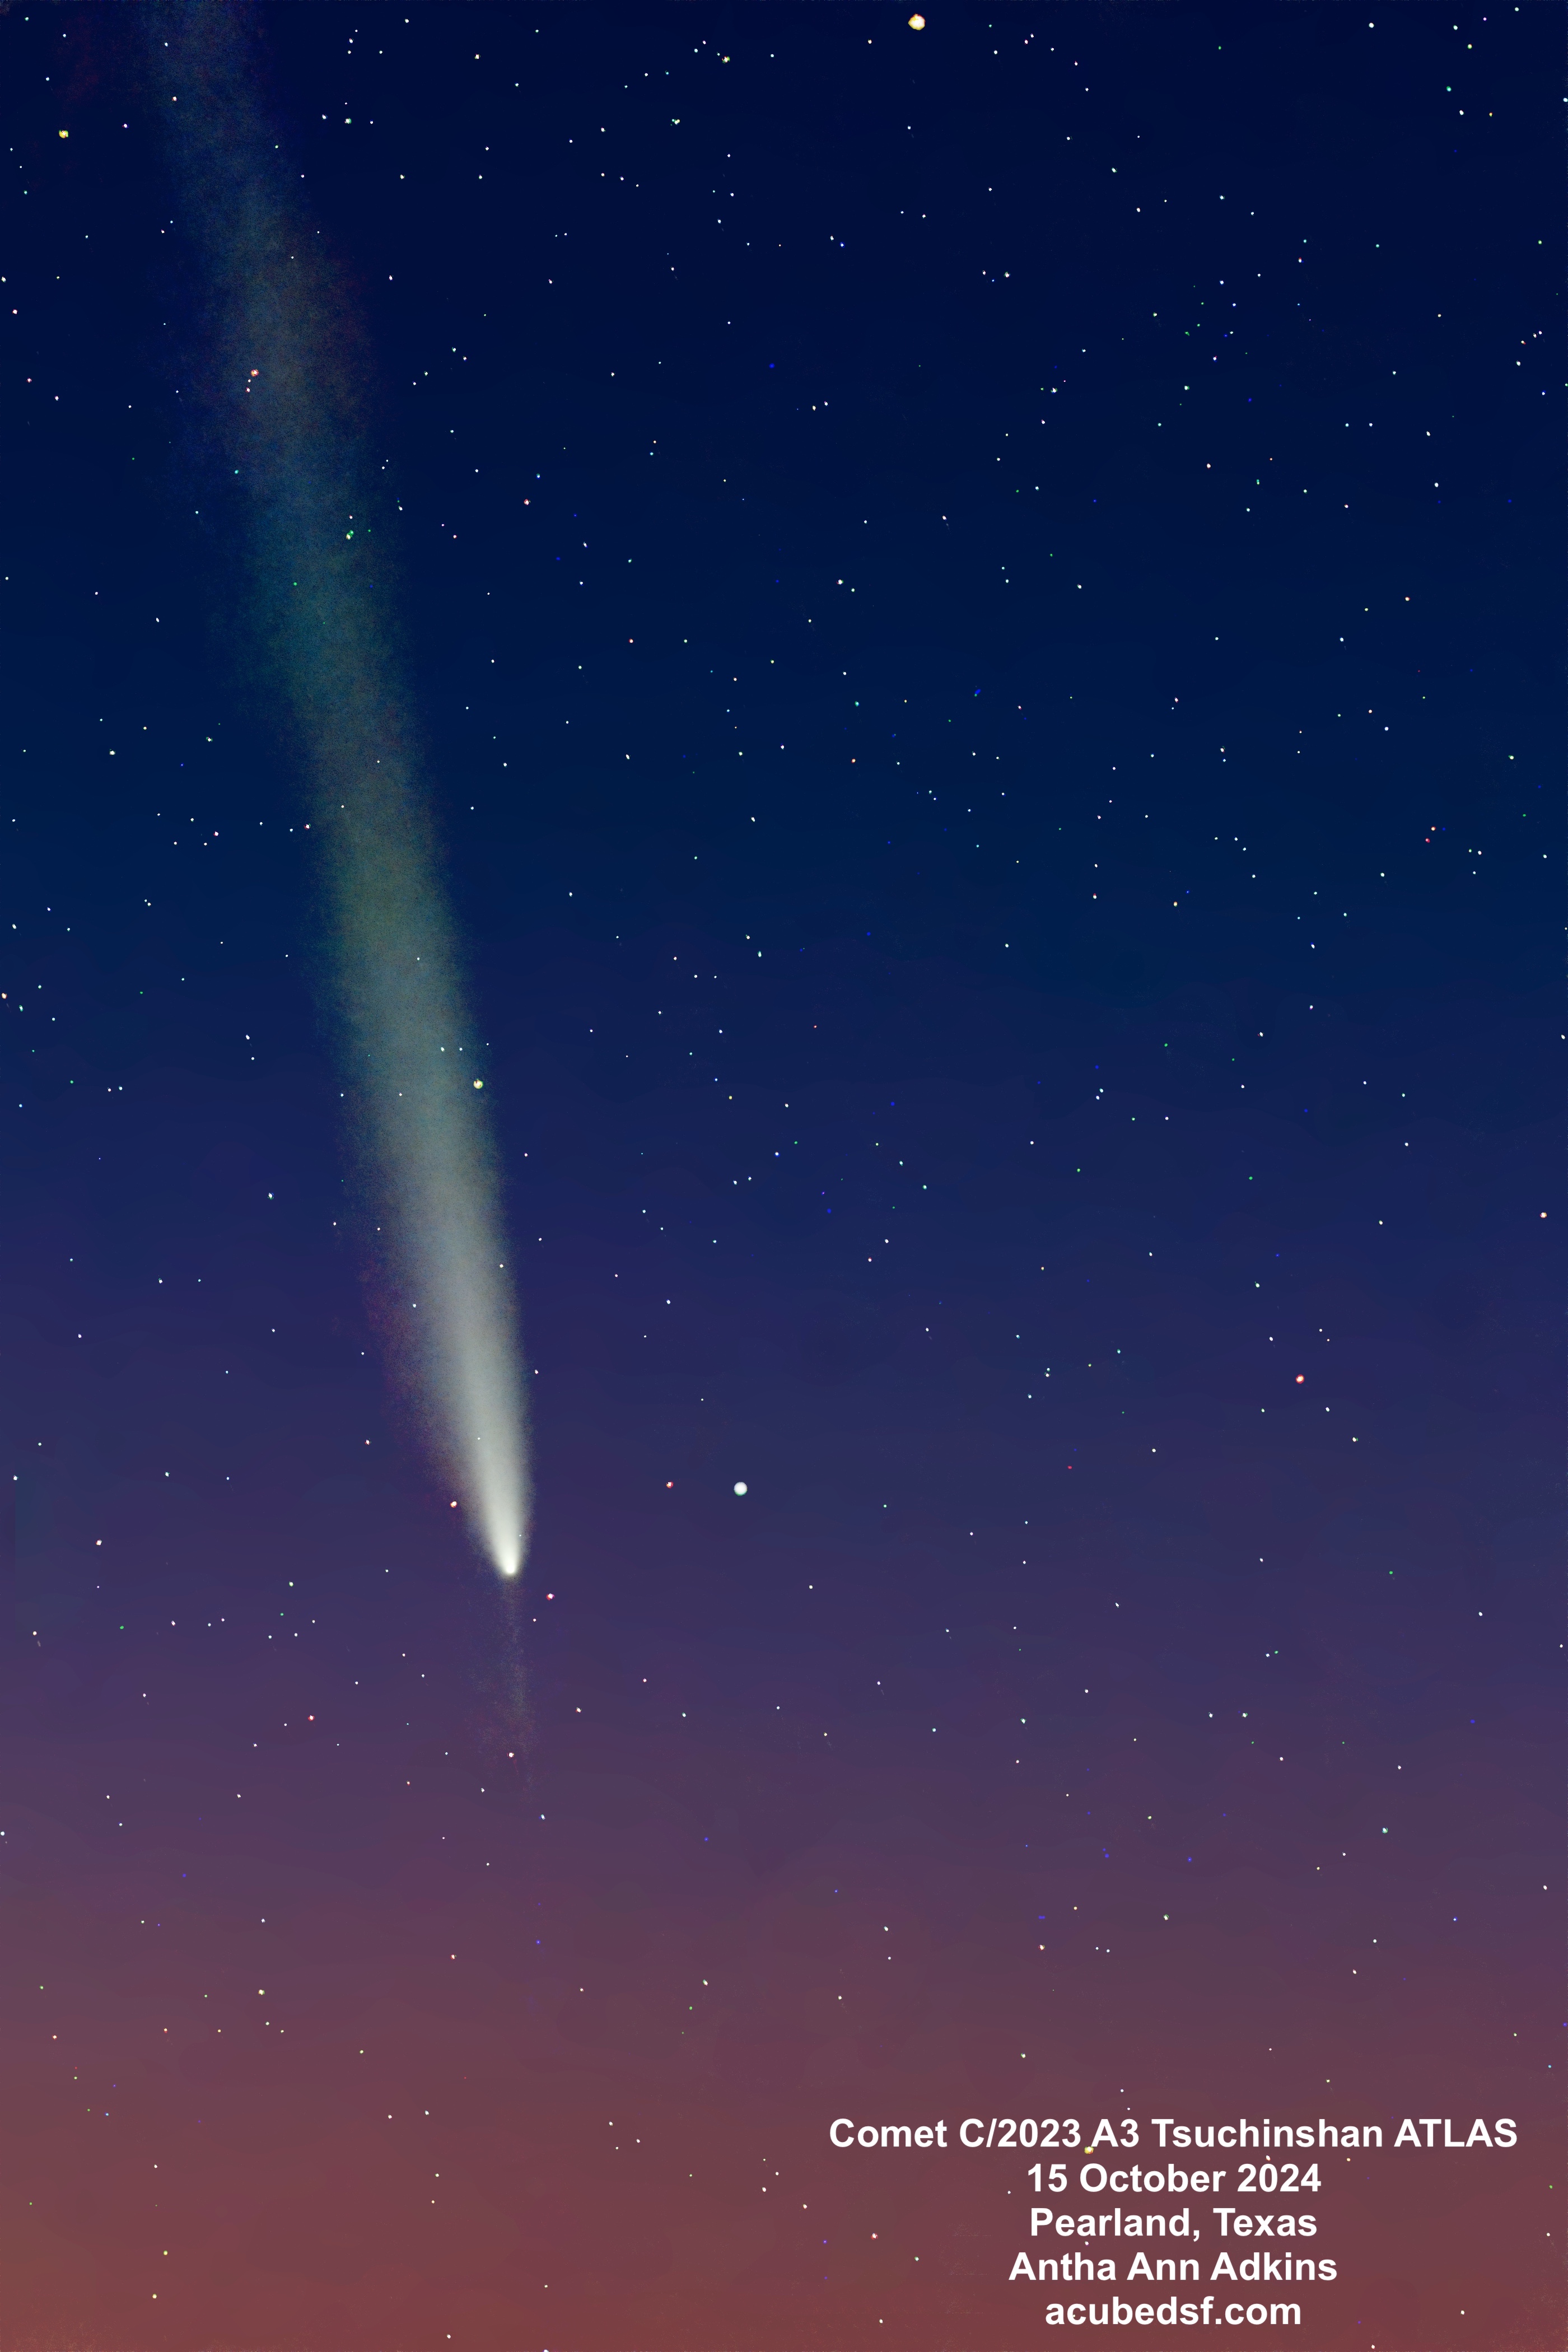
Processing comets is still a big challenge for me, with more steps than processing a nebula.  I mostly follow the excellent process outlined by Adam Block in his Comet Academy.  Blinking through my frames, I could see the comet moving across the sky, another sure indicator that I had captured the right object!  After aligning, integrating, and stretching the comet images, I could see a faint tail that stretched all the way across the field of view (about 2 degrees with this telescope and camera combination), but the background noise was brighter than it was.  I tried several methods to make the tail visible, and the one that worked the best was to “murder the background” as Adam says in one of his videos.

I’m probably not going to get another chance to capture this one, but I enjoyed getting to see it at least once.  Has anyone else tried to go out and capture this one?

Camera geek info:

  • William Optics Zenith Star 73 III APO telescope
  • William Optics Flat 73A
  • ZWO 2” Electronic Filter Wheel
  • Antila RGB filters
  • ZWO ASI183MM-Pro-Mono camera
  • William Optics Uniguide 32MM F/3.75
  • ZWO ASI220MM-mini
  • ZWO ASiair Plus
  • iOptron CEM40
  • Bacliff, Texas Bortle 6 suburban skies

Frames:

  • April 12, 2025
    • 47 15 second Gain 150 Green lights
    • 30 0.02 second Gain 150 Green flats
    • 45 15 second Gain 150 Blue lights
    • 30 0.02 second Gain 150 Blue flats
    • 50 15 second Gain 150 Red lights
    • 30 0.05 second Gain 150 Red flats
  • 30 Flat Darks from library
  • 30 Darks 

Processing geek info:

  • PixInsight
  • BlurXterminator
  • NoiseXterminator
  • StarXTerminator
  • Generalized Hyperbolic Stretch

The Creation of NGC6888 the Crescent Nebula

NGC6888, also called the Crescent Nebula, is an emission nebula around a Wolf-Rayet Star, WR136.  It’s located in the Milky Way, approximately 5000 light years away, and it has an apparent size of 18 x 12 arcminutes, making it 26 x 17.5 light years across.  It’s estimated to be 30,000 years old.

Although it may seem similar since it is a nebula around a star, the Crescent Nebula is not a planetary nebula, and its ultimate ending will be very different from a planetary nebula.  Planetary nebulae occur when an intermediate mass star, 1 to 8 solar masses, expands into a red giant, sheds its outer layer, and shrinks to a white dwarf.  The high temperature and wind from the white dwarf ionizes the shed outer layer, making the beautiful nebulae.  The Crescent Nebula was made by a massive star, estimated to initially be <= 50 solar masses.  When it was a main sequence star, fusing hydrogen early in its life, its solar wind blew a bubble in the gasses surrounding it.  When it became a Red Super Giant, its slow solar wind filled the bubble with its outer layer, estimated to be 25 solar masses worth of material. And when the star collapsed into a super hot Wolf-Rayet star, now about 21 solar masses in size, its fast solar wind compressed the red super giant and Wolf-Rayet material into ionized filaments and clumps.  Eventually, the Wolf-Rayet star will fuse its matter creating heavier and heavier elements until it reaches iron, when it will implode and create a supernova.  

Visually, the nebula appears to have an outer Oiii “skin” and a “clumpy” Ha interior.  The Oiii skin is the boundary between the main sequence bubble and the Wolf Rayet shell, and the clumpy Ha interior is the red super giant material compressed by the Wolf Rayet shell.  A “blowout” in the Oiii skin can be seen in the lower right in the blue Oiii in this image.  The Interstellar Medium (ISM) – the cold low density gas between stars – may have been less dense in this direction, allowing the Oiii skin to blow out in this direction and not in other directions where the ISM is denser.   

I used data from my driveway in Friendswood, Texas with suburban Bortle 7 – 8 brightness skies (lots of light pollution) to make this image.  In order to capture the detail in this nebula and the outer Oiii shell, I needed a lot of data: 12.4 hours of Ha data and 15 hours of Oiii data, plus an hour of RGB data for the stars, taken over ten nights.

This is a narrowband image, mapping Oiii to blue and Ha to red.  My goal was to capture both the details in the Ha and the outer Oiii shell. 

Some people think this looks like a cosmic “brain.”  What do you think?  Isn’t our galaxy beautiful?

Camera geek info – Narrowband:

  • Williams Optics Zenith Star 73 III APO telescope
  • Williams Optics Flat 73A
  • ZWO 2” Electronic Filter Wheel
  • Antila HO and RGB filters
  • ZWO ASI183MM-Pro-Mono camera
  • ZWO ASIair Plus
  • iOptron CEM40
  • Friendswood, Texas Bortle 7-8 suburban skies

Frames:

  • July 4, 2024
    • 104 60 second Gain 150 Ha lights
    • 30 1.0 second Gain 150 Ha flats
  • August 2, 2024
    • 95 60 second Gain 150 Oiii lights
    • 30 0.5 second Gain 150 Oiii flats
  • August 8, 2024
    • 215 60 second Gain 150 Oiii lights
    • 30 0.5 second Gain 150 Oiii flats
  • September 7, 2024
    • 247 60 second Gain 150 Oiii lights
    • 30 0.5 second Gain 150 Oiii flats
  • September 12, 2024
    • 237 60 second Gain 150 Ha lights
    • 30 1.0 second Gain 150 Ha flats
  • September 13, 2024
    • 198 60 second Gain 150 Oiii lights
    • 30 0.5 second Gain 150 Oiii flats
  • September 17, 2024
    • 133 60 second Gain 150 Ha lights
    • 30 1.0 second Gain 150 Ha flats
  • September 19, 2024
    • 271 60 second Gain 150 Ha lights
    • 30 1.0 second Gain 150 Ha flats
  • September 20, 2024
    • 143 60 second Gain 150 Oiii lights
    • 30 0.5 second Gain 150 Oiii flats
  • September 21, 2024
    • 17 60 second Gain 150 red lights
    • 20 60 second Gain 150 green lights
    • 20 60 second Gain 150 blue lights
    • 30 0.05 second Gain 150 red flats
    • 30 0.02 second Gain 150 green flats
    • 30 0.02 second Gain 150 blue flats
  • 30 Flat Darks from library
  • 30 Darks from library

Processing geek info:

  • PixInsight
  • BlurXterminator
  • NoiseXterminator
  • StarXTerminator
  • Generalized Hyperbolic Stretch
  • NBColourMapper

Comet C/2023 A3 Tsuchinshan ATLAS with M5

Comet C/2023 A3 Tsuchinshan ATLAS put on quite a show after it rounded the sun and passed by the Earth on its way likely out of our solar system.  With an orbital eccentricity greater than 1, its orbit appears to be hyperbolic, meaning it’s not coming back unless something perturbs its orbit.

In this picture, you can see the comet’s bright nucleus and coma, its long dust tail, and its anti-tail, but not a separate ion tail.

When comets travel close to the sun, solar radiation heats up the comet nucleus, and it outgasses. Outgassing delivers both gas and dust to the region around the nucleus, forming a coma, a (temporary) atmosphere around the comet.  The solar radiation and solar wind act on this coma to push the gas and dust away from the sun to form a tail.  Three separate tails can be visible: the ion tail, the dust tail, and the anti-tail. The ion tail, also called the gas tail or type I tail, is the tail formed by the ionized gasses pushed away from the comet, and it points away from the sun.  The dust tail, also called the type II tail, is the tail formed by the dust pushed away from the comet, and it stays more in the comet’s orbit and appears to curve away from the gas tail.  The anti-tail consists of the larger dust particles that were not pushed as much and remained in the comet’s orbit.  The anti-tail appears to point towards the sun, and it is only visible when the Earth passes through the comet’s orbital plane near the time when the comet passed by the sun.  Because of these special conditions to see the anti-tail, it is not observed with most comets.

Another item visible in the image is M5, a globular cluster in our galaxy.  It is the large bright “star” to the right of the comet nucleus.  Because this image was taken with an 85 mm lens, and M5 was sorted to the “stars” image in my processing, it just appears to be a large bright star.  I suspect with some additional processing, I could have made it look fuzzier, though there aren’t a lot of pixels at this scale.  The Messier objects are “fuzzy” objects that comet-hunter Charles Messier made a list of because they weren’t comets – so it’s fun to see one next to a comet.  M5 is 24,500 light years away from Earth and has an angular size of 23 arc-minutes, making it about 165 light years across.  It’s thought to be one of our galaxy’s older globular clusters, at 13 billion years old.

Processing this image was tricky for several reasons: 1) it was made from images taken with a camera on a tripod, so the sky was moving in each frame, 2) the comet was moving relative to the sky, and 3) the images were taken at dusk, when the sky gradient is also changing in every image.  I benefited greatly from following the methods and advice in Adam Block’s Comet Academy.  One additional trick I used was to run BlurXterminator in correction only mode on all the registered images as my first step since the 4 second tripod images had visible star trails. 

Getting to this image has taken almost a month of watching videos, learning new tools, and trying various tool combinations and settings.  Some of these steps had to be run on each individual image – all 233 of them – meaning some processing steps took many hours.  After all that work, I am happy with the results.

I started with this image because I thought it would be the easiest of my set of C2023A3 comet images to process … the other images are from darker skies in terms of light pollution but closer to dusk and include a foreground.  But the comet was brighter!  I’m really looking forward to processing them and sharing the result!  Hopefully they won’t take a month each to process!

Camera geek info:

  • Canon EOS 60D in manual mode, 4 second exposures, ISO 1600
  • Canon EF 85 mm f/1.8 lens, manual focus at infinity
  • Intervalometer
  • Tripod
  • Pearland, Texas Bortle 7-8 dark skies

Frames:

  • October 15, 2024
    • 233 4 second lights
    • 30 0.0025 second flats
    • 30 0.0025 second darks

Processing geek info:

  • PixInsight
  • BlurXterminator
  • NoiseXterminator
  • StarXterminator
  • StarNet2
  • NormalizedScaleGradient

Capturing the 2024 Total Solar Eclipse in Granbury, Texas: Time Lapse Experience

I made a (time lapse) movie to try to capture the 2024 total solar eclipse we experienced in Granbury, Texas.

The movie doesn’t capture the planning and replanning needed to capture this event.  Months ago, looking at the predicted weather, the weather across most of Texas was expected to be favorable for viewing the eclipse. I chose to stay in Temple, Texas which was within the band of totality, not too far from the centerline, and had a reasonably priced place for my husband, daughter, and I to stay.  It turned out to be a great place to stay – we could pick up our daughter from an airport in Dallas and travel to Austin to see the Lady Bird Johnson Wildflower Center (which given the combination of the weekend, eclipse tourists, and peak wildflower season was quite crowded).  Even along the side of the road, the bluebonnets were plentiful, so I got my iconic Texas bluebonnet picture on this eclipse trip.

By the night before the eclipse, it was clear that Temple was going to have a lot of cloud cover for eclipse day.  We were rained on (twice) the last time we tried to see a total solar eclipse, and we did not want to repeat that experience!  So I used the Astropheric app on my phone (with four different cloud cover models) to look south to Austin/San Antonio (did not look promising) and north to Dallas/Fort Worth (looked better), and I settled on going to Hillsboro, Texas (which had temporarily re-named itself Eclipseboro), which was an easy drive up I35 and right on the centerline.  

But Monday morning when I got up, the cloud odds were not looking good for Hillsboro either.  So I looked at the options again and decided to trade time in totality for better cloud odds and decided to drive northwest to Granbury, Texas.  We picked up breakfast and started driving.

Some had predicted massive traffic, difficulty getting gas, and difficulty getting food.  There were even road signs to warn of the upcoming traffic.  

We didn’t experience any of that.  No traffic, no difficulty getting gas, no difficulty getting food.  And, best of all, we drove out from under the heavy clouds and saw the sun shining in a blue sky with white puffy clouds.

We decided to view the eclipse from Hewlett Park.  A group from New Mexico State University were set up there, doing an experiment with weather balloons.  They allowed us to set up at the periphery of their launch area.  I got my telescope set up well in advance of the eclipse start, so I was able to capture a time lapse of the entire thing.  

I was able to see sunspots and use them to focus my telescope.  A few minutes before the eclipse, I started my intervalometer to capture a picture a minute.

Once the time lapse started, we had some clouds pass in front of the sun, which was worrisome.  But I had noticed in Astropheric that pretty much every prediction had shown fewer clouds during the actual eclipse. And a book I had bought on this trip, Totality: The Great North American Eclipse of 2024, by Mark LIttmann and Fred Espenak explained why.  The Sun heats the Earth and pulls water from lakes and plants into the sky, where it cools and forms clouds.  But when the Moon starts to block the Sun, this heating process stops, water stops being pulled up, and the clouds dissipate.  This effect won’t help with the heavy cloud cover of a front, but does eliminate fluffy white clouds.  And we saw the clouds dissipate and the sky grow clearer.

We also saw the folks from New Mexico State University release their weather balloons.

We walked around looking for cool crescent shadows, but didn’t spot any.  Nor did we spot any changes in color.

But we did see it get really dark.  The sign on the hotel across the street came on as did the streetlights.

I had wanted to take some wide angle pictures with my smaller camera, but I did not get it set up in time.  When we reached totality, I decided not to mess with it and just enjoy the experience and take pictures with my telescope.  

It was the weirdest alien sky I have ever seen. It was dark.  But there was this elliptical bright white glowing spot in the sky, with a perfect black circle in the middle.  I could see the two brightest planets – Venus and Jupiter – on either side.  It.  Was.  Awesome.  

I took the solar filter off my telescope, reaimed the solar tracking mount (either it lost track or I bumped it in my excitement), and manually took pictures.

I looked for the comet, but did not spot it.

I alternated between taking pictures and looking at the sky.  

One of the things that I could see naked eye was a bright pink spot on the lower edge of the Moon.  I thought maybe it was the diamond ring effect, but it lasted for too long.  Later I found out it was a solar prominence.  Amazing!

I saw the edge getting brighter and took a set of pictures to try to capture Bailey’s beads and the diamond ring effect – I got the diamond ring for sure.  

When the picture got super bright, I put the solar filter back on the telescope and returned to letting it take a picture a minute.

By now the clouds were gone, and we laid on our picnic blanket with our solar glasses and watched the Sun come back out.

We watched until the Sun had fully emerged from behind the Moon.

Friends, before this eclipse, I said that I would rather photograph an annular eclipse because it was a more exciting subject.  I.  Was.  Wrong.  There is nothing like a total solar eclipse.

And so I’m left asking: When can I see this again?

Stay tuned!!

Camera geek info for solar pictures:

  • Canon EOS 60D in manual mode, 1/200 second exposure, ISO 100
  • Intervalometer
  • Williams Optics Zenith Star 73 III APO telescope
  • Williams Optics Flat 73A
  • Thousand Oaks optical solar filter
  • Sky-Watcher SolarQuest HelioFind tracking mount and tripod

Camera geek info for corona pictures:

  • Canon EOS 60D in manual mode, 1/200 second exposure, ISO 100
  • Williams Optics Zenith Star 73 III APO telescope
  • Williams Optics Flat 73A
  • Sky-Watcher SolarQuest HelioFind tracking mount and tripod

Total Solar Eclipse 2024 in Granbury, Texas: Totality and Solar Prominences

One of the things that surprised and amazed me during totality of the solar eclipse was a bright pink spot on the lower edge of the Moon that I could see naked eye.  At first, I thought maybe it was the diamond ring effect, but it was not – it was a solar prominence!  And when I looked at my pictures, I discovered that it was one of several.

Solar prominences are loops of plasma that are anchored to the sun’s surface and extend out into the sun’s corona, following the local magnetic field.  The plasma is made of electrically charged hydrogen and helium. Hot hydrogen emits red light, which is why they appear pink.

Since we are close to the maximum of the solar sunspot cycle (solar max is expected to occur within the next year), there happened to be a lot of prominences for this eclipse.  So cool!  

These pictures show the solar prominences during totality and the diamond ring effect where the sun emerges at the end of totality.

Camera geek info for corona pictures:

  • Canon EOS 60D in manual mode, 1/200 second exposure, ISO 100
  • Intervalometer
  • Williams Optics Zenith Star 73 III APO telescope
  • Williams Optics Flat 73A
  • Sky-Watcher SolarQuest HelioFind tracking mount and tripod

Processing geek info:

  • PixInsight