M42 Orion Nebula: Exploring Narrowband and Composite Imagery

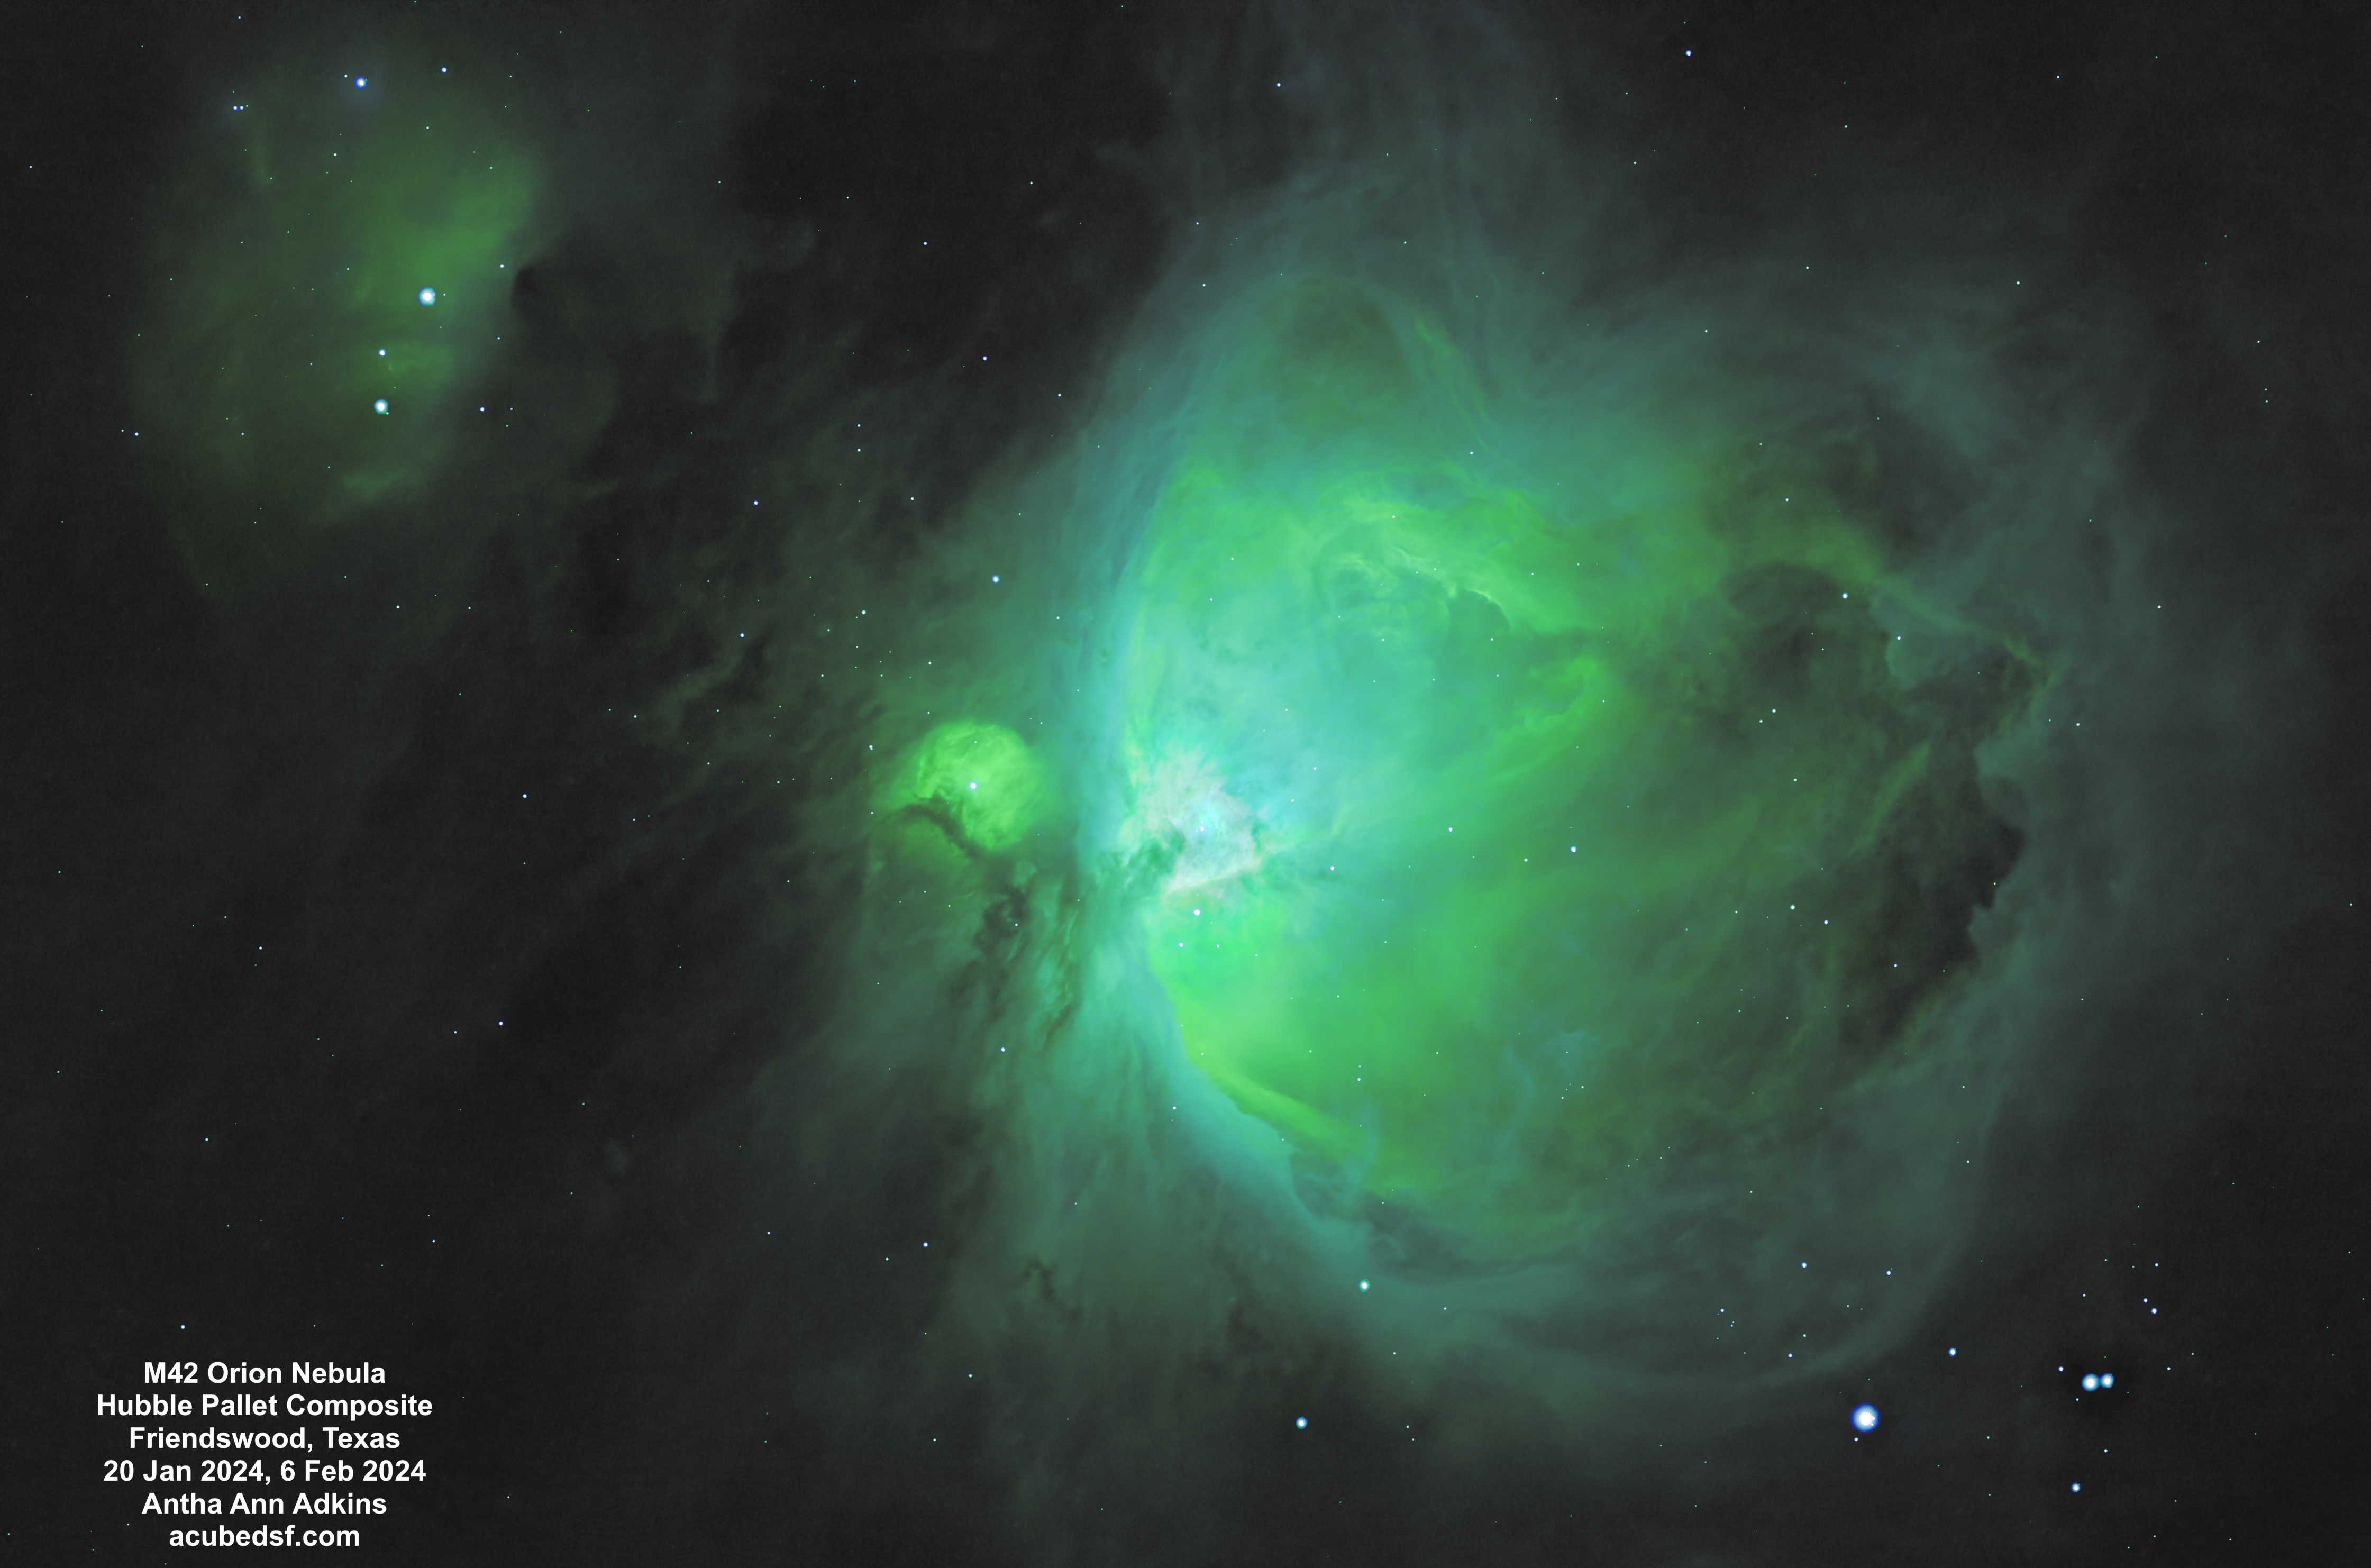
Just as I used M42 the Orion Nebula as the target for first light with my new RGB filters, I also used M42 the Orion Nebula as the target for first light with my new narrowband filters.

I used the standard set of narrowband filters: H-alpha, Oiii, and Sii.

Not only did generating these images involve learning how to use my new hardware, but it also involved learning new processing, both processing narrowband data and making a composite image.

For narrowband imaging, each filter needs to be assigned a color to map it to an RGB image.  The figure below shows how colors map to wavelengths, and the table below shows what colors the three narrowband filters map to.  If a natural mapping is used, the final image will use red and turquoise only.  So a false color mapping is often used to better bring out details.  One common pallet is the Hubble pallet, where Hα is assigned to green, Oiii is assigned to blue, and Sii is assigned to red.  PixInsight has a new tool, NBColourMapper, which can make these color mappings – or any other assignment.  For these images, I only had a limited amount of Sii data, so they are limited in the color that Sii is mapped to.  For these images, I tried both a “natural” mapping and a “Hubble” mapping.  Which do you like better?

Visible-spectrum-400-700-nm
ElementEmission lineWavelengthColor
Hydrogen656.3 nmRed
OxygenOiii500.7 nmTurquoise
SulfurSii671.6 nmRed

The Orion Nebula has an enormous amount of dynamic range – more than can be captured in a single setting.  If the image is exposed to bring out the detail in the core of the nebula, the edges are too faint.  If the image is exposed to bring out the edges of the nebula, the core is blown out.  For these images, I made three versions of the image from two different sets of exposures: a version optimized for the core from the 60 second data, a version optimized for the middle zone from the 180 second data, and a version optimized for the outer edges from the 180 second data.

I tried a number of different processing flows to try to make a good composite from the three images using the new PixInsight tool BlendImage.  What I thought ended up working was the following process:

  • Make mask for core area from bright area of mid version
  • Apply core mask to core image as protecting
  • Use core image as base image in ImageBlend
  • Use mid image as blend image in ImageBlend
  • Blend using lighten/mask
  • Set opacity so edges look good
  • Make mid mask for mid area from bright area of outer version
  • Apply mid mask to mid_core image as protecting
  • Use mid_core image as base image in ImageBlend
  • Use outer image as blend image in ImageBlend
  • Blend using lighten/mask
  • Set opacity so edges look good

Astrophotography often extends what the human eye can see by taking (or integrating to) long exposure times, much longer than the human eye and brain can combine.  To me, narrowband mapping and composite imagery (as long as it’s labeled as such), is just another extension.  What do you think?

Camera geek info:

  • Williams Optics Zenith Star 73 III APO telescope
  • Williams Optics Flat 73A
  • ZWO 2” Electronic Filter Wheel
  • Antila SHO filters
  • ZWO ASI183MM-Pro-Mono camera
  • ZWO ASiair Plus
  • iOptron CEM40
  • Friendswood, Texas Bortle 7-8 suburban skies

Frames:

  • January 20, 2024
    • SHO lights
      • 47 60 second Gain 50 Ha lights
      • 60 60 second Gain 50 Oiii lights
      • 54 60 second Gain 50 Sii lights
    • 30 0.05 second Gain 50 H flats
    • 30 0.05 second Gain 50 O flats
    • 30 0.05 second Gain 50 S flats
    • 30 0.05 second flat darks
    • 30 60 second darks
  • February 6, 2024
    • SHO lights
      • 15 180 second Gain 50 Ha lights
      • 49 180 second Gain 50 Oiii lights
    • 30 0.05 second Gain 50 H flats
    • 30 0.05 second Gain 50 O flats
    • 30 0.05 second flat darks
    • 14 180 second darks

Processing geek info:

  • PixInsight
  • BlurXterminator
  • NoiseXterminator
  • StarXTerminator
  • Generalized Hyperbolic Stretch
  • NBColourMapper
  • ImageBlend

M42 The Orion Nebula and M101 the Pinwheel Galaxy: First Light with New Astrophotography Equipment

Back at the end of November, I bought some new astrophotography tools/toys: 

  • ZWO 2” Electronic Filter Wheel
  • Antila LRGBSHO filters
  • ZWO ASI183MM-Pro-Mono camera
  • ZWO ASiair Plus

Of course, as the old astrophotography joke goes, buying new tools meant we had seemingly months of cloudy skies.

Happily, this time of year meant I got to have first light with one of my favorite Deep Space Objects: M42 the Orion Nebula.

I finally got an opportunity for first light with the new equipment December 29, 2023, but the filter wheel was jammed by one of the connecting tubes (I ordered a better one) so I didn’t get any good data.  

I got a second opportunity on December 30, 2023 but I had to resort to swapping in the filters by hand, which meant bringing the telescope back inside to change out filters and restarting ASiair every time.  The resulting images ended up rotated relative to one another in such a way that I couldn’t crop out all the sections that weren’t covered by all three filters.  This wasn’t surprising since I had to unscrew all the parts to swap out filters.  I also think I may have mislabeled which set of images was which color since the result came out an odd purple color.  Rotating the color assignments seemed to fix that.  The experience gave me a real appreciation for the filter wheel! 

Here is the processed image:

Camera geek info:

  • Williams Optics Zenith Star 73 III APO telescope
  • Williams Optics Flat 73A
  • Antila RGB filters
  • ZWO ASI183MM-Pro-Mono camera
  • ZWO ASiair Plus
  • iOptron CEM40
  • Friendswood, Texas Bortle 7-8 suburban skies

Frames:

  • December 30, 2023
    • RGB lights
      • 52 60 second Gain 50 R lights
      • 30 60 second Gain 50 G lights 
      • 54 60 second Gain 50 B lights 
    • 30 0.05 second Gain 50 RGB flats
    • 30 0.05 second Gain 50 flat darks
    • 30 60 second Gain 50 darks

Processing geek info:

  • PixInsight
  • BlurXterminator
  • NoiseXterminator
  • StarXTerminator
  • Generalized Hyperbolic Stretch

I got a new ring to connect the filter wheel and got first light on the whole new setup, try 3, on January 20, 2024, and I got data for both M42 the Orion Nebula and M101 the Pinwheel Galaxy which I could compare to previous images taken with my Canon 60D DSLR.  I appreciated the ASiair being able to configure a whole run including switching filters and have it automatically run.  I also appreciated the ASiair connecting to my iPad so I could see each image on my iPad from inside my house where it was warm!  I did still go outside to watch the telescope meridian flip to make sure no wires were caught. 

Here is the processed M42 Orion Nebula RGB image (dated 20 January 2024) with a previous DSLR image in the slideshow. The differences are hard to see and may be related to processing.

Camera geek info:

  • Williams Optics Zenith Star 73 III APO telescope
  • Williams Optics Flat 73A
  • ZWO 2” Electronic Filter Wheel
  • Antila RGB filters
  • ZWO ASI183MM-Pro-Mono camera
  • ZWO ASiair Plus
  • iOptron CEM40
  • Friendswood, Texas Bortle 7-8 suburban skies

Frames:

  • January 20, 2024
    • RGB lights
      • 59 60 second Gain 50 R lights 
      • 60 60 second Gain 50 G lights 
      • 57 60 second Gain 50 B lights
    • 30 0.0417 second Gain 50 G flats (a setting goof)
    • 30 0.0417 second Gain 50 B flats (a setting goof)
    • 28 0.05 second Gain 50 R flats
    • 30 0.05 second flat darks
    • 6 60 second darks

Processing geek info:

  • PixInsight
  • BlurXterminator
  • NoiseXterminator
  • StarXTerminator
  • Generalized Hyperbolic Stretch

Here is the processed M101 the Pinwheel Galaxy RGB image (dated 20 January 2024) with previous DSLR images in the slideshow. Here, the improvement is obvious, with significantly more detail in the galaxy with the new camera.  It even compares well to images taken from the much darker Dell City skies (February 2023 and June 2023).

Camera geek info:

  • Williams Optics Zenith Star 73 III APO telescope
  • Williams Optics Flat 73A
  • ZWO 2” Electronic Filter Wheel
  • Antila RGB filters
  • ZWO ASI183MM-Pro-Mono camera
  • ZWO ASiair Plus
  • iOptron CEM40
  • Friendswood, Texas Bortle 7-8 suburban skies

Frames:

  • January 20, 2024
    • RGB lights
      • 59 60 second Gain 50 R lights 
      • 60 60 second Gain 50 G lights 
      • 57 60 second Gain 50 B lights
    • 18 0.05 second Gain 50 R flats
    • 24 0.05 second Gain 50 G flats 
    • 17 0.05 second Gain 50 B flats
    • 30 0.05 second flat darks
    • 6 60 second darks

Processing geek info:

  • PixInsight
  • BlurXterminator
  • NoiseXterminator
  • StarXTerminator
  • Generalized Hyperbolic Stretch

I’m really pleased with this new equipment, and I’m looking forward to seeing what I can do with it!

M42 The Orion Nebula and Astrophotography Learning Curve

I’ve bought some new astrophotography gear, so it’s been cloudy for a month (LOL), and I’ve had the opportunity to go back and process some old data of a favorite Deep Space Object (DSO), M42, The Orion Nebula.

The Orion Nebula is an emission nebula of ionized hydrogen gas where star formation is taking place.  It’s located in the Milky Way, approximately 1344 light years away, and it’s approximately 24 light years across, giving it an apparent size of 1 degree.

The Orion Nebula is one of my favorite DSOs because it is bright and can be enjoyed so many ways.  It is visible to the naked eye as the middle “star” in Orion’s sword.  It can be seen to be a fuzzy object with binoculars.  The trapezium of stars in the core can be seen even with a small telescope like mine.  And astrophotography brings out its full size and color.  

The nebula to the left of the Orion Nebula is called the Running Man nebula.  Can you see the dark running man?  The Running Man nebula is a reflection nebula, reflecting the light of local stars.  It is approximately 1500 light years away, and approximately 15 light years across, giving it an apparent size of 34 arc-minutes.  

The image above was made from 66 minutes of data (22 3 minute images) from the fabulous dark skies of Dell City, Texas.

Camera geek info:

  • Canon EOS 60D in manual mode, 3 minute exposure, ISO 1600
  • Intervalometer
  • Williams Optics Zenith Star 73 III APO telescope
  • Williams Optics Flat 73A
  • iOptron CEM40
  • Dell City, Texas Bortle 2-3 dark skies

Frames:

  • October 28, 2022
    • 22 3 minute lights (66 minutes total)
    • 10 6 second darks

Processing geek info:

  • PixInsight
  • BlurXterminator
  • NoiseXterminator
  • StarXTerminator
  • Generalized Hyperbolic Stretch

The Orion Nebula shows my own astrophotography learning curve.  I imaged it in 2019 with just a DSLR, telephoto lens, and a sky tracker.  And I processed a single image from the 2022 set used above before I learned how to use PixInsight.  This set, you’ll notice, did not include the flat and flat dark calibration frames I use now.  

Not having all the calibration frames worked out OK in Dell City … but no such much from my light-polluted skies in suburban Friendswood, Texas.  Here is what I get with no flat calibration frames (note all the dark spots not calibrated out), no light pollution filter, and my current knowledge of PixInsight.  Yes, I could have lost some of the nebula detail and hidden the dark spots, but that’s a cost to not having good calibration frames.  Since it’s fast and easy to take flats, they’re totally worth it.

Camera geek info:

  • Canon EOS 60D in manual mode, 119 second exposure, ISO 200
  • Intervalometer
  • Williams Optics Zenith Star 73 III APO telescope
  • Williams Optics Flat 73A
  • iOptron CEM40
  • Friendswood, Texas Bortle 7-8 suburban skies

Frames:

  • November 26, 2022
    • 27 119 second lights (53.55 minutes total)
    • 6 119 second darks

Processing geek info:

  • PixInsight
  • BlurXterminator
  • NoiseXterminator
  • StarXTerminator
  • Generalized Hyperbolic Stretch

A couple of months after I took the previous image, I learned what calibration frames I needed.  Here is what I got with data taken from my suburban driveway with calibration frames, a light pollution filter, and my current knowledge of PixInsight.

Camera geek info:

  • Canon EOS 60D in manual mode, 19 second exposure, ISO 800
  • Intervalometer
  • Williams Optics Zenith Star 73 III APO telescope
  • Williams Optics Flat 73A
  • SkyTech 2” LPRO-MAX CCD Filter
  • iOptron CEM40
  • Friendswood, Texas Bortle 7-8 suburban skies

Frames:

  • January 26, 2023
    • 143 19 second lights (45.3 minutes total)
    • 25 0.02 second flats
    • 21 0.02 second flat darks
    • 47 20 second darks

Processing geek info:

  • PixInsight
  • BlurXterminator
  • NoiseXterminator
  • StarXTerminator
  • Generalized Hyperbolic Stretch

These three images had similar total exposure lengths.  The Dell City image, with the longest total exposure time, highest ISO, and darkest skies, is the best of the three.  The slightly shorter November 2022 image from Friendswood is flawed due to the lack of calibration frames.  The even shorter January 2023 image from Friendswood is starting to show noise in the background.  But the nebulae themselves are beautiful!

As I said, I’ve recently gotten some new astrophotography gear, and first light on it was the Orion Nebula.  Stay tuned for the results!!

3 Minute Pictures from Dell City – October 2022

A few weeks ago, we took my telescope and tracking mount on a road trip to our favorite Air B&B in Dell City, Texas.  My telescope and I enjoyed the dark (Bortle 2-3) skies.

Here are some three minute long exposure images I was able to get:

Andromeda Galaxy (M31) plus two satellite galaxies (M32 and M110).  The Andromeda Galaxy is the nearest large galaxy to our own, at 2.5 million light years away.  Its apparent size is 3.167 degrees by 1 degree.  In comparison, the Moon has an apparent size of 0.52 degrees on average.  The Andromeda Galaxy filled the screen on my camera – this image is not cropped at all.  It has an apparent magnitude of 3.44. 

Triangulum Galaxy (M33).  The Triangulum Galaxy is the third largest galaxy in our local group, after the Andromeda Galaxy and the Milky Way.  It’s 2.73 million light years away, and its apparent size is 1.2 degrees by 0.7 degrees.  It has an apparent magnitude of 5.72.  

Crab Nebula (M1) with Mars.  M1 is the remnant of a supernova observed in 1054.  It’s located in the Milky Way, 6500 light years away.  Its apparent size is 7 arcminutes by 6 arcminutes, and it has an apparent magnitude of 8.4.  Mars, of course, is the fourth planet in our own solar system, and the brightest object by far in the image.  

Eye of God (or Helix) Nebula (NGC7293).  The Helix Nebula is planetary nebula – the gases expelled from a star before it becomes a white dwarf, lit up by that star.  It’s located in the Milky Way, approximately 655 light years away.  Its apparent size is 25 arcminutes, and it has an apparent magnitude of 7.6.  

Orion Nebula (M42).  The Orion Nebula is one of my favorite objects in the sky, and one I’ve photographed before.  It’s a diffuse nebula, a cloud of dust and gas that is forming new stars.  It’s located in the Milky Way, about 1344 light years away.  Its apparent size is 65 by 60 arcminutes, and it has an apparent magnitude of 4.

Camera geek info:

  • Canon EOS 60D in manual mode, 179 second exposure, ISO 1600, custom white balance 3500K
  • Williams Optics Zenith Star 73 III APO telescope
  • Williams Optics Flat 73A
  • iOptron CEM40
  • Dell City, Texas Bortle 2-3 dark skies

I’m really looking forward to photographing these from my suburban driveway to see how the images compare.  It will be interesting to see if I get a white screen (pure light pollution) at these settings.  I’ll let you know!

I’m also looking forward to learning how to stack together a sequence of images with PixInsight to see what an hour plus image looks like.  I’ll share that when I figure out how to do it!